SYNOPSIS

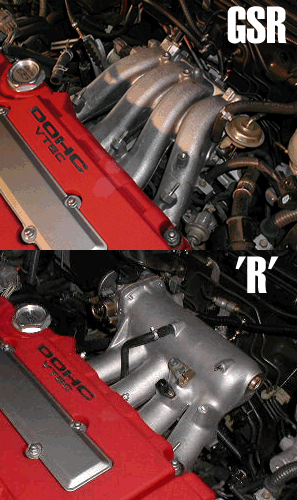
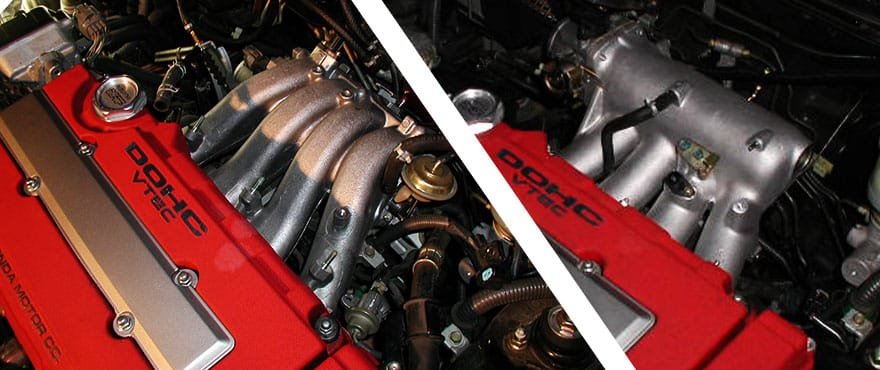
This article covers the installation process of a Skunk2 Type-R style intake manifold (I/M) for the GSR B18C1 P72 head. This applies to both JDM & US versions of the P72 head. Upgrading to the Skunk2 manifold will unlock potential top-end power by deleting the use of the secondary-dual-butterfly system found on all JDM & US P72 B18C ‘snail shell‘ intake manifolds – by converting the breathing habits to that of a Type-R single butterfly I/M system. Although, there are ways of enhancing the breathing habits with your existing P72 I/M , the Skunk2 I/M is a great alternative and is a definite bang-for-your-buck upgrade. Not only does the Skunk2 manifold free up top-end breathing, but it’s a bolt-on power maker of approximately 7-8 horses!
Read on for installation procedures…
PARTS REQUIRED

If you want a clean looking intake manifold setup, especially when it comes to the throttle cable & bracket, get the following parts:
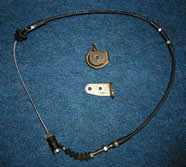
- Integra-R throttle cable bracket / Honda part # 16411-P73-000
- Integra-R throttle cable / Honda part # 17910-ST7-R01
- Throttle body pulley from a non-GSR throttle body
- A GS-R intake manifold gasket (if you can’t reuse your old one, for some reason)
- A GS-R throttle body gasket (if you can’t reuse your old one, for some reason)
- Small Japanese hands
SUGGESTED TOOLS TO USE
- 12mm & 10mm socket (short + deep), ratchet, and extension(s)
- 12mm & 10mm open/closed end (box) wrenches
- Phillips head screw driver
- Small pic or tiny flat head screwdriver for injector clip removal
- Long bent-tip needle nose pliers for those damn hose clamps
- Shop rags to collect any spills
- Small Japanese hands (a joke! geez, relax!)
INSTALL PROCEDURE
- Begin, by raising the front end of your car up and placing it on jack stands
- Disconnect the battery negative & positive cables for safety purposes
- Drain the coolant into some kind of container that you can cover, so dirt will not fall in (if you plan to reuse) and/or animals will not drink from it!
- MAKE SURE NO PETS ARE AROUND!!!
If dogs or cats drink coolant they have a pretty good chance of DYING from it, if not caught in time – NO JOKE! Coolant crystalizes in animals kidneys and will give them a slow death. - Loosen up your gas cap to relieve gas pressure from the fuel tank
- Start disconnecting all vacuum & radiator hoses/lines from the intake manifold using the long needle nose pliers (real handy!)
- Disconnect sensor plugs, injector plugs (use a pick), etc., from the intake manifold and throttle body
- Take the 12mm socket + ratchet and loosen up the fuel filter pressure-release bolt, some fuel will leak out, so have a rag handy
- Using a 10mm socket, remove the black plastic wire harness cover from the fuel rail
- Remove the vacuum hoses from the FPR (fuel pressure regulator)
- Again, using the 10mm socket, carefully remove the nuts that hold the fuel rail down to the I/M. CAREFUL! those small 10mm screws can easily fall out of your hands and can get easily lost behind the engine – I hate when this happens!
- Carefully wiggle the fuel rail off. The injectors will probably come off along w/the rail. Try not to damage or rip the rubber o-rings that are on the injectors. Also, try to not lose the round black grommets that hold the injectors in place
- Place the fuel rail w/injectors still attached to it, somewhere out of the way, even though the rail is still attached to the fuel filter hose. Just get it outta the way, near the battery somewhere, you don’t need to fully remove it.
- [ Support Bracket Removal ]
If your OEM P72 intake manifold has never been removed (you’re in for a real treat), there’s an annoying bracket on the backside which needs to be removed. It attaches from the underside of the P72 I/M to the backside of the engine block, as a support bracket for the heavy-ass OEM P72 I/M. You don’t need to use it on the Skunk2 I/M if you don’t want to. - Get underneath your car so you can see the underside of the GSR manifold and the lame support bracket
- Use a ratchet with a nice long extension to reach the two 12mm bolts and remove the support bracket.
See images 1-3.


- While you’re under there, disconnect any sensors/hoses/etc. that are still connected to the P72 I/M, such as the IAB sensor (black-round canister mounted on the underside of the GSR manifold). Loosen up and remove all of the 12mm flange nuts that are holding the P72 manifold to the head from the underside too.
- Then remove the rest of the 12mm flange nuts from the topside of the P72 I/M
- [ Prepping the Skunk2 I/M ] Once you’re done removing all 12mm flange nuts, double check that all sensors, vacuum lines, and any coolant lines are not connected to the P72 manifold
- If everything looks go-2-go, carefully remove the P72 manifold.
See image 4.

- Once removed, using a 12mm socket, remove the TB from the P72 manifold and carefully peel the TB gasket off using a razor blade to helps a lot. You wanna try and preserve the TB gasket and reuse it.
- Next, you will prep the Skunk2 I/M, by swapping over the P72’s fuel rail, TB mounting posts, and required sensors
- You can start off by removing the P72 fuel rail mounting posts using two of the 10mm fuel rail nuts. See image 5.

- Next are the TB mounting posts. Remove and apply these posts using the same technique as used on the fuel rail posts
- Next are the sensors. Swap over the IAT and IACV sensors.
See image 6 & 7.


- Then apply the ITR throttle cable bracket.
See image 8.

- Lastly, swap over the rubber fuel injector grommets onto the Skunk2 manifold.
See image 9.

- [ Throttle Pulley Swap ] Now that you’re temporarily done fussing w/either manifolds, it’s time for throttle body adventures!
- Now, I’m assuming you’ve acquired a non P72-GSR throttle body pulley. If you haven’t done so, get one!
TIP: Almost any 88-01 civic/integra NON P72 TB throttle pulley will work on a P72 TB
See image 10.

- Use a 10mm socket to remove the P72 TB pulley. Then apply the NON P72 TB pulley.
Note: You *might* have to fiddle around with remounting the retention spring a bit, but its not hard to figure out. - Next, remove the big funky P72 throttle cable support bracket that’s directly on the P72 TB.
See image 11.

- The P72 TB is ready — that wasn’t too bad now, was it ? (naaw!).
If you’d like to, you can mount the prepped P72 TB onto the Skunk2 I/M now. Reuse your P72 TB gasket IF you haven’t fully damaged it! - Now, go install the Type-R throttle cable in your vehicle. It’s pretty straight forward, so I’m not including the how-to procedure on this.
- [ Prepping the PCV Valve ]
Once you’re done installing the ITR throttle cable in your vehicle, go back to your engine bay and take a look at the area where that bloody I/M support bracket lives.
You should see the factory oil catch can with 2 lines plugged into the topside. This is where the PCV valve lives.
See image 12.

- Once you’ve pulled out the PCV valve, get a lengthy vacuum or coolant tube and attach it to the PCV valve. Then plug the PCV valve back into its respective location (for a test fit).
See image 13

- Now, take the pre-prepped Skunk2 I/M and place it on the head as if you’re about to bolt it on. Slip the PCV tube up and in between the manifold’s runners till it reaches the vacuum spout in the middle of the plenum.
See image 14.

- [ Finishing Touches ]
If the PCV tubing looks like it will fit without binding problems or anything of that nature, its ready. - Check to see if all coolant lines can be put back to their original location. If you’re like me; I like to bypass the coolant lines which run to the TB’s fast idle throttle valve (FITV), located on the bottom side of most TB’s. Although, bypassing the FITV is not a good idea if you live in a cold weather climate zone!
- Once you’re done overlooking your coolant routings, tighten down all of the 12mm flange nuts to a good snug or to factory torque spec (that is, if you can reach a torque wrench down into those tiiite spots)
- Apply the P72 TB to the Skunk2 manifold if you haven’t done so yet
- Fit the PCV valve and coolant lines back to their respective locations
- Remember the fuel rail & injectors? Well, it’s time to re-install those. Use the 10mm nuts to secure the fuel rail to the fuel rail posts, then connect the fuel pressure regulator vacuum tubing.
NOTE: The brown ceramic spacers that sandwich in-between the fuel rail + manifold are NOT USED. To check this, make sure that there are no loose gaps between the fuel injectors and fuel rail. If there is a gap and the injectors sit rather loose, remove those ceramic spacers! or else you’ll have leaky fuel injectors! And because those ceramic spacers are not used, the fuel rail will sit lower on the mounting posts, and you just might have to elongate the mounting holes on the fuel rail to comply with the mounting posts. You’ll see what I mean… - Connect the throttle cable’s hammer-end into the throttle pulley; then mount the cable to the throttle-cable bracket. Make sure you’re getting full throttle too. Have someone sit in the car while stepping on the gas pedal and look into the TB and see if the brass butterfly inside the TB is opening all the way. Adjust the throttle-cable if the butterfly isn’t opening all the way
- Re-connect all of the sensors (MAP, TPS, IAT, IACV, etc.)
- DON’T FORGET: To tighten down the 12mm fuel pressure release nut on top of the fuel filter!
- Re-tighten your gas cap.
- Re-fill your radiator fluid, either with new coolant or reuse your previous coolant.
- Double-check that everything is OK, connected, lookin’ good, etc.
- If all is good, get in your car and turn your ignition on 2 clicks and wait + listen for the fuel pump – but don’t turn the car on yet! This will build up fuel pressure. Leave the car on and go check your engine bay and see if there’s any fuel leaks or spray coming from the fuel injectors, fuel rail, or fuel filter. There shouldn’t be any leaks if everything was put back correctly. If no leaks – so-far-so-good! Now, go ahead and fully turn the engine on (3rd click). It might take a couple turns for it to kick over, so don’t trip, it’ll start.
- Once running, check for coolant leaks etc, if all looks good you’re install is a success!
If you have any funky, high or erratic idle problems, double-check any vacuum lines or any unplugged sensors. Maybe toy around with your idle-adjustment screw on the TB.
Lower the car back down to the ground, go for a test drive, and clean up ya’ damn mess!

ADDITIONAL INFORMATION
By now, you should know that a Skunk2 I/M uses a single-butterfly design, and an OEM P72 I/M uses a dual-butterfly design. Well, a stock P72 ecu doesn’t know that you changed over to a single butterfly style intake manifold, and seeing that the Skunk2 manifold is essentially a Type-R manifold, you’ll need to adjust your ecu for this change. Mainly, the VTEC crossover point needs to raised.
Here’s a few options:
- Option 1)
You can run your stock GSR ecu as-is for the time being, but performance wise, it will not feel right with the stock VTEC crossover point kicking on at approx. 5000rpms…so.. - Option 2)
Purchasing a VTEC controller is suggested, so you can raise the VTEC point up to about 5500-5700rpm …or… - Option 3)
Have your ecu reprogrammed (chipped). If you have an OBD1 P72 ecu have it reprogrammed (by me!) w/ a customized VTEC, redline, & fuel maps. If you own an OBD2 vehicle, I suggest converting to OBD1 or running a Type-R ecu. Although, if you go with this route, I suggest that you upgrade your camshafts to at least civic or integra type-R cams (you don’t have to – its suggest tho). Actually, you should upgrade your camshafts anyways, to benefit even more gains from the Skunk2 I/M upgrade!


Thanks and go right ahead!
Thanks!
I suggest upgrading to FireFox or Google Chrome – WAY better than IE my friend =)
Damn FFsquad does it again baby, making it cakewalk for any type of swap/modification
Thank you sooooooooo much!!! This article has been extremely helpful!! No one could have made a better guide! YOU ARE AWESOME!!! THANK YOU!!
Tom, you’re welcome =)
Building my all motor jdm gsr (slowly over time that is), and i’m at the Skunk2 pro series IM install stage w. thermal gasket …this guide is pure gold!!! *build to date is: Hondata S300 v3 for the brains, RDX turbo 410cc injectors, stock internals, MR ss 4-2-1 exhaust header going to Magnaflow cat-con going to Vibrant stealth muffler (2.5″ all the way),, Blackworks 68mm TB w. thermal gasket, 7lb fidenza flywheel and exedy clutch w. lsd trans. Having it dyno tuned next Saturday. Wish me luck, and a thousand thank-you’s’ for the nugget of 24 carot gold that is the install guide!!!
excellent! glad to hear this old how-to article is still helpful!