
UPDATE 9/04/18
Updated some wording and typos.
UPDATE 10/07/09
A poster by the name of William pointed out and error with the CKF bypass trick information posted here, and well, it’s now time for yet another CKF revision! Not sure how or why my information on this was slightly off but this article has been revised and should have a lot less people wondering why this trick isn’t working for them (yet it does for others? weird). Anyways, what William pointed out will not only fix the Code 9 issues some of you are experiencing but is the right way in performing the CKF bypass altogether. Thank you William!
UPDATE 2/19/09 (now superseded)
I’ve slightly revamped this page to better explain the CKF bypass trick due to the CEL 9 issue that has recently arisen. There are now two methods you can perform – but – I HIGHLY suggest performing method 1 first then move onto method 2 (noted in red) if you get a CEL code 9 once you’ve tried method 1. If you’re not getting a CEL code 9 with method 1 there is no need to perform method 2 – otherwise you may give yourself CEL 54 or 9 if you apply method 2 when it is not required.
UPDATE 9/3/08
There have been reported CEL CODE 9 (CYP) issues once the CKF bypass trick has been performed on certain OBD2 civic/integra vehicles. There is a fix for this problem which is explained within the procedures in RED below.
NOTE: You DO NOT need to perform the new method if you’re NOT getting CEL code 9!
SYNOPSIS
This article describes how to trick a U.S. OBD2a/b (96-01) Civic & Integra ecu into thinking a CKF sensor is wired in when there actually is no CKF sensor available.
NOTE: This bypass trick does NOT WORK for 96-01 OBD2 preludes or 96-02 accord vehicles. This trick is strictly for OBD2 Civic/Delsol/Integra/and CR-V vehicles.
What is the CKF sensor?
The CKF is the Crank Fluctuation Sensor.
All US 96-01 OBD2a/b Honda/Acura vehicles have this sensor that is integrated onto the oil pump. (CKF images soon)
This trick is aimed to help hybriders who are using a US OBD2a/b ecu in their vehicle (for whatever reasons) to manage the engine, yet the engine is lacking a CKF sensor.
Here’s a few scenarios where this bypass trick comes in real f**kn handy:
- When using a JDM OBD2 B-series engine in a US 96-01 civic/integra powered by a US OBD2 ecu. JDM engines are not equipped with oil pump mounted CKF sensor like US OBD2 engines are. Some people want to stay smog + street legit. This bypass trick allows this very desired feature without needing to convert to OBD1. It’s also been proven that you CAN pass smog and the state REF (here in CA) while this mod is in performed – it passes the OBD2 scanner tool.
- When using a US OBD2 B-series engine in a 92-95 Civic/Integra powered by a US OBD2 ecu (via jumper harness adapter). Same info from above applies here.
For the unknowing – when using a US OBD2 ecu + the CKF sensor is not wired in, the engine will run like total crap plus you’ll get a nasty CEL (code 54). This bypass trick basically taps the CKF into the CKP signal and rides the CKP signal essentially tricking the ecu. This bypass trick will save you time, money (around $300), and severe headaches!
OBD2a Civic/Integra – 96-98 Civic / 96-97 Delsol / 96-99 Integra
Please refer to the ecu pin out page for the CKF pin location(s):
OBD2a pin out schematics
Get yourself 4 Scotch-lock/tap splicers
Sometimes dubbed a ‘quick splice’, these can be real life savers. Grab 2 of these and a pair of pliers for the squeeze-splicing portion of the job:

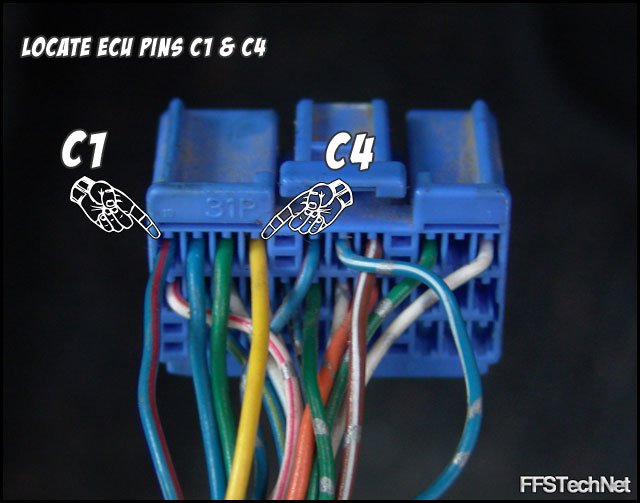
Locate ECU connector ‘C’.
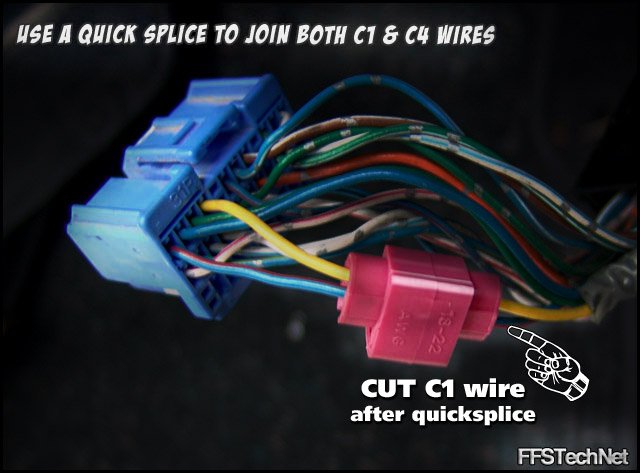
Then look for pinout C1 (CKFP) and C4 (CYPP) in the orientation shown w/the release tab facing upwards and wires leading into the back of the connector. Using the pliers, quick-splice these two wires together as shown.
Now, cut C1 (blue wire w/red stripe) AFTER the quick-splice. This will sever the connection that leads to the actual CKFP sensor signal to the ECU and prevent conflicts with the ECU that may arise such as CEL 9 (CYP) and P1337 (CSF sensor no signal). This will allow C1/CKFP signal to piggyback the C4/CYPP signal without issue.
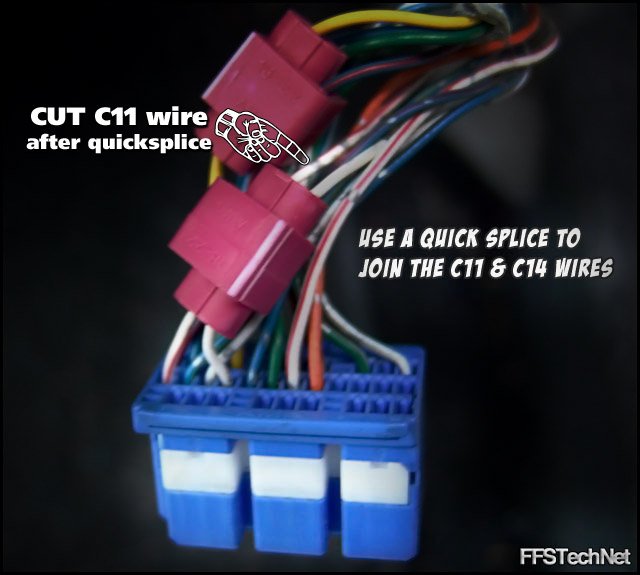
Now, on the same ‘C’ connector, locate pin C11 (CKFM) and C14 (CYPM) and quick-splice these two wires together as shown.
Now, cut C11 (white wire w/red stripe) AFTER the quick-splice. Doing this will sever the connection that leads to the actual CKFM signal to the ECU and prevent conflicts with the ECU that may arise such as CEL 9 (CYP) and P1337 (CSF sensor no signal). Ultimately, this will allow C11/CKFM signal to piggyback the C14/CYPM signal without issue.

FINALLY, RESET THE ECU BY UNPLUGGING THE ECU CONNECTORS FROM THE ECU FOR ONE FULL MINUTE OR PULL THE ECU BACKUP FUSE IN THE ENGINE BAY FUSE BOX FOR ONE FULL MINUTE TO CLEAR THE ECU’S MEMORY.
That’s it!
Your finished OBD2a quick-splice job should look something like this:
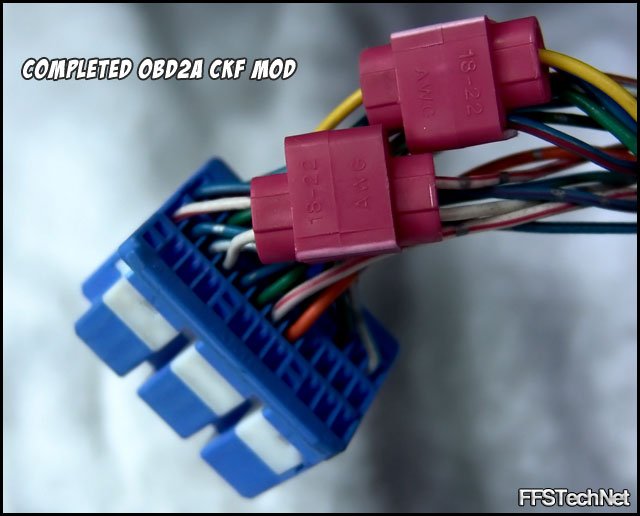
OBD2b Civic/Integra – 99-00 Civic / 00-01 Integra
Please refer to the ecu pin out page for the CKF pin location(s):
OBD2b pin out schematics
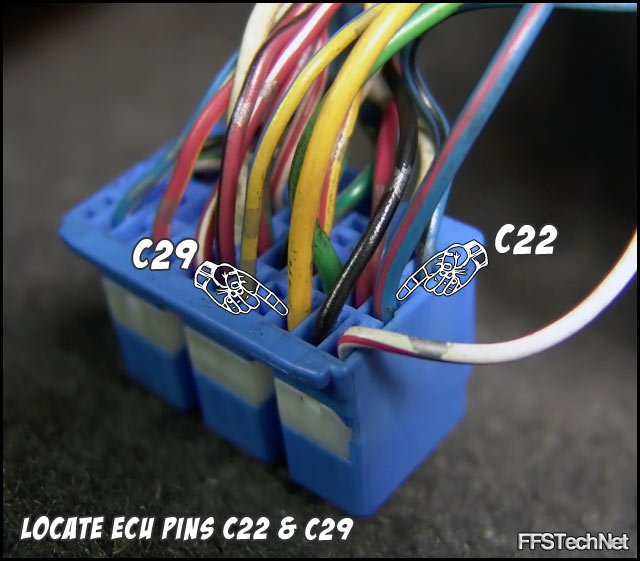
Locate the blue ecu connector ‘C’:

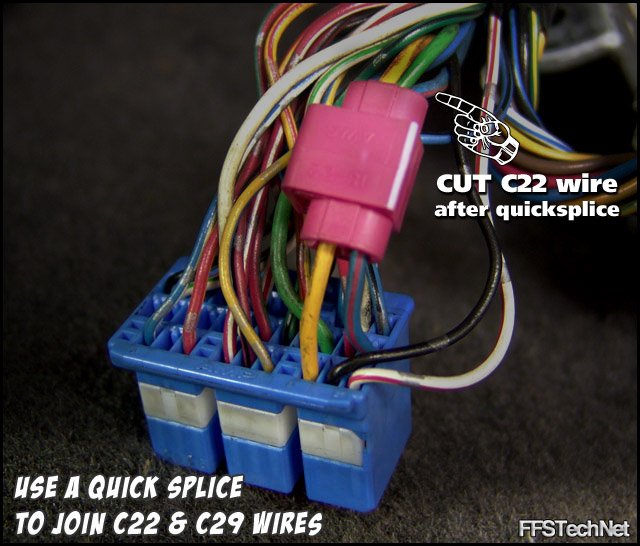
Locate pinout C22 (CKFP) and C29 (CYPP) in the orientation shown – w/the release tab facing upwards and wires leading into the back of the connector. Using the pliers, quick-splice these two wires together as shown.
Now, cut C22 (blue wire w/red stripe) AFTER the quick-splice. Doing this will sever the connection that leads to the actual CKF sensor to the ECU and prevent conflicts with the ECU that may arise such as CEL 9 (CYP) and P1337 (CSF sensor no signal). Ultimately, this will allow C22/CKFP to piggyback the C29/CYPP signal without issue.
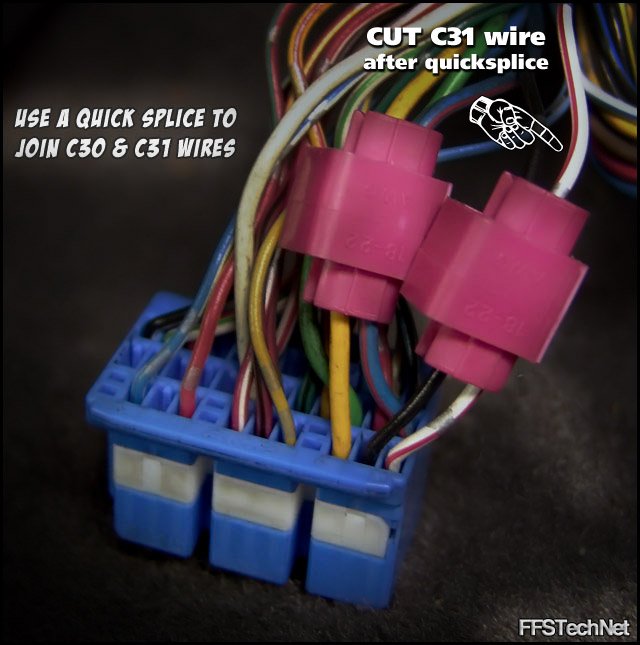
On the same ‘C’ connector, locate pin C30 (CYPM) and C31 (CKFM). Quick-splice these two wires together as shown.
Now, cut C31 (white wire w/red stripe) AFTER the quick-splice. Doing this will sever the connection that leads to the actual CKF sensor to the ECU and prevent conflicts with the ECU that may arise such as CEL 9 (CYP) and P1337 (CSF sensor no signal). Ultimately, this will allow C30/CYPM to piggyback the C31/CKFM signal without issue:

FINALLY, RESET THE ECU BY UNPLUGGING THE ECU CONNECTORS FROM THE ECU FOR ONE FULL MINUTE OR PULL THE ECU BACK-UP FUSE IN THE ENGINE BAY FUSE BOX FOR ONE FULL MINUTE TO CLEAR THE ECU’S MEMORY.
That’s it!
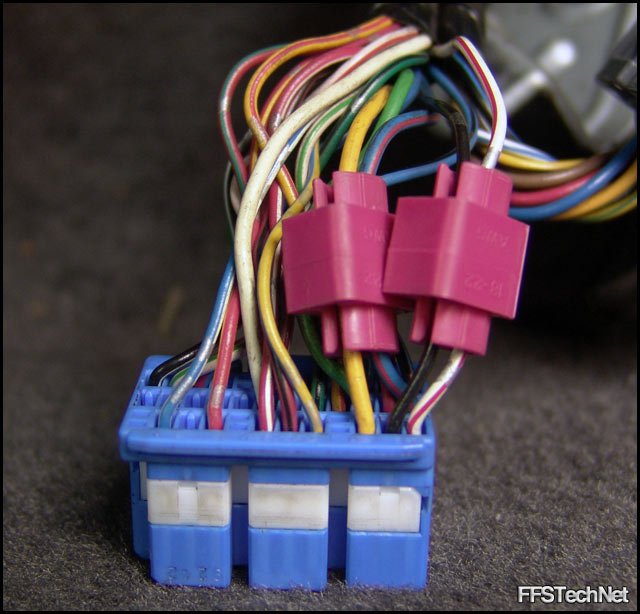
Your finished OBD2b quick-splice job should look something like this:
i have a obd2b ecu after cutting the c22 and c31 wires the cel come on
What would happen if it is done to a car that has the sensor on the pump but the sensor is broken? Is it doable?
If the CKF sensor on the pump is broken, I HIGHLY suggest performing this trick. The sensor is not needed for this trick to work.
Did you make sure to splice C22 to C29 and C31 to C30 before cutting? C22 & C31 are basically piggy backing and sharing the signal of C29 & C31. If not depinned or cut will cause a CEL.
hey wassup guys i did the procedure and still getting the cyp code p1382??? help i need inspection asap
FYI, not everyone experiences code 9 when performing the regular CKF bypass trick (excluding the updated procedure in red).
If you’ve performed the updated CKF procedure noted in red, reconnect/reinsert the pins you’ve disconnected into the respective connector so that you’re following the ‘old’ CKF procedure. Hopefully, this will fix your problem.
hey first i did it without disconecting anything then i disconnect same thing
and btw my b16 swap knock is broken would it kick that cyp code no right??
after doing this trick i still get code 54 ……any help would be a bigg thanks
i have a 97 civic dx hatchback and i am trying to BAR (ref) a 1998 B18b1 motor… i am using a 98 civic EX engine harness.. WOULD I NEED TO THIS TRICK ALSO?
i was wondering what the symptoms are without doing this ckf trick…im guessing i need to do this if im running an lsv on my ek but still is running an ob2b ecu (p2t si ecu)…
Please read the latest update – perhaps this will fix your problem
Dota,
There is no need for you to perform this trick because you’re swapping in a US ’98 OBD2 engine that has the CKF sensor integrated on the oil pump just like your SOHC engine. Only think you have to do is swap the B18B CKF 2-pin plug over to your civic harness (color match the wires to whatever the B18B CKF wiring is – if the motor comes with the harness).
Sevenfc,
The symptoms if not performed while using a US OBD2 ecu will be really crappy engine performance. Car will not idle; will be very hard to start the car, engine will stumble upon acceleration.
i just recently got an lsv with a b18b block w gsr head on my ek and im still in the break in process…and my problem is if when my car is sitting there for awhile and then i start it, my car will idle low and sometimes die unless i rev it for a couple mins to warm up and have its idle…could that b the problem why my car is doing this or just cus its just in a break in process…would u suggest for me to do this trick..
It’s the first time I commented here and I should say you give us genuine, and quality information for other bloggers! Great job.
p.s. You have an awesome template . Where have you got it from?
So with a chipped P28, you wouldn’t have to preform this trick? If B16a2 is swapped into a ’99 EK?
Thanks, and Katman great info, keep up the good work.
Cheers!!
Hi. I just swapped in a replacement 98 JDM B20B engine into my 1998 Honda CRV (automatic). The oil pump on the JDM motor is different and does not the Crank Angle Sensor rivet mounting. So I left the oil pump alone and installed the motor. I performed the CKF Bypass Trick and still have code 9 as my only check code. Will this trick work on CRV models as well? I know this write-up is fore Civics/Integras but figured it should be the same since it’s all in the computer anyways. Any ideas? Thanks.
Floorjack,
Thanks! The theme used is a modified version of Mimbo2.2
Nicky,
That is correct – no need to perform the CKF bypass trick if converted to OBD1. It’s only required to do when using a US OBD2 ecu.
Ramil,
That is correct. JDM engines do not have a CKF sensor on the oil pump, only US OBD2 engines do. I’m not 100% sure this trick will work on a CRV, but I’m assuming it does as CRV’s are built from a 96-00 Civic platform. If you are getting code 9, try following the Method 2 procedures within the how-to article.
code 54 now
I guess it’s a little different on the CRV models. All I had to do was splice the 4 wires together. No cutting or de-pinning required. Runs perfect and no CEL! Thanks Katman.
Ramil-
ah interesting! thanks for sharing your outcome. Need to test this in a civic and integra – perhaps splicing all 4 wires will be the new CKF bypass method!
Car ran perfect all of yesterday. However, today the CEL came back on at a stop light. Made it back home safe and had no issues. Code 54 is now back. Car runs perfect and idles like a champ. I cleared the code and let the car idle for 10 minutes. It has not come back on as of yet. Not sure what else to try.I tried the first method which involved spicing and then cutting a few inches back. Then I tried splicing and left all wires attached; no de-pinning or cutting. I guess the last step left for me to try is to depin C22 and C31. Any other ideas? There is nothing wrong with the performance of the motor even with the code 54, however it would be nice if there were no codes at all. Thanks.
Do I still need to perform this method if I’m using an obd2 to obd1 jumper on an obd2 jdm engine?
Peter-
No – CKF trick is NOT required when running an OBD1 ecu. It’s only required when using a U.S. OBD2 ecu.
PLEASE HELP!! I also have a 98 CRV with a jdm B20 in it with no crank sensor. I have, like Ramil, tried splicing all four and seperately and still have a CEL. Anyone have any idea where to go from here. Thanks
gr8 –
Sorry, I have no experience with CRV’s and their crank sensor at the moment. What Ramil suggested seems to be the best method for now, even though the ECU seems to throw what looks like a false-positive CEL; car runs fine yet there’s a CEL 54.
hey man great write-up. i havnt yet performed the procedure so i wanted to ask you a question first. i have a 96 prelude and i dropped in an obd1 G22 non vtec (f22 block with an h23 head) and i replaced the oil pump with an obd2 oil pump and installed the crank sensor and tdc sensor along with the obd2 timing cog and obd2 balancer shaft gear and my car only runs on 2 cylinders. im also throwing a code for the crank sensor so im guessing that the crank sensor i installed was bad. i came across this write-up and was like hell yea so my question is, if i do this do you think the code will go away and my car will run on all 4 like its supposed to?
did not solve my problem,cutting the wires cel 54 comes back on,no more code 9 though
roc,
I keep hearing about this not working for some people and I’m not sure what to say. I don’t currently have a solution, but one thing is that either method 1 or 2 shows a false positive, meaning the trick is working (car runs fine) yet throws a CEL code.
Bryan,
Nice engine setup. Um, I would assume the CKF trick would work for you. Are you using an OBD2 or OBD1 distributor? I’m wondering if your wiring for the CKF and/or TDC sensor may be crossed or mis-wired making your car run on 2 cylinders.
i dont think i’m getting a false code though,cel 54 appears and the car runs like crap
hey, i have a b18c5 w/ usdm p73 on my 98 civic. i’m getting a code 54 so i tried the “method 1” trick and it went away but i got a code 9 instead so i tried the “method 2” and i’m still getting a code 9.
now i’ve tried to us a jdm p73 and the cel’s are gone but i’ve heard i wont pass emissions with a jdm ecu……
so my question is how can i fix my problems with my usdm ecu which have code 9 with method 1 & 2 ??
Katman, im in process of doing the CKF trick and just realized my C14 wire is BLACK, compared to the one you have in your write up which is WHITE (C14). my C12 is WHITE. Does this make any difference? Any help will be appreciated. Thanks.
I have done the trick and my engine runs better but somtimes during long ride the check engine pop up and it gives me Cylinder 1 misfire, Random misfire at the same time..But theres no misfire at all and the engine still running great…
Have U ever heard about that?
Guillaume,
Yes, this sounds like the false-positive anomaly that this trick sometimes has for some people. You can try resetting the ECU by pulling the ECU fuse (in the engine bay) for 30 seconds, whenever this happens. It’s all I can suggest for now.
mathai,
If the wire color is different, no problem. It’s the specific pin location (C14) that is important because that is specifically for the CYPM. Wire colors sometimes change between certain year Honda/Acura’s (hate that!).
ba2,
True, you cannot pass emissions (at least here in California) with a JDM ecu. My only suggestion to resolve your issue(s) is to run a US OBD2 B-series oil pump w/CKF sensor. It’s all I can suggest for those who this CKF trick does not work for. I’m rather bummed these issues have arisen recently…
I have an OBD-2 motor and ecu. Im trowing a code for the Cfk malfunction. could i do this instead of buying a new sensor?
Katman,
I have a B18C on a 97 ek9 and i’m using a 98 ex wireharness, Will i have to do this trick or not?
P.S. Great job on this website!
I have a 1997 civic ex with a d16y7 and plan to swap a newer 1999 d16y8.
will i need to do this CKF bypass trick to make it work?
thanks
Leo,
You only need to perform this trick if you’re using a US OBD2 ecu.
Btw, if you are using a US OBD2 ecu, you’ll need to swap out EX’s 3-wire EX CKF plug for that of a B-series 2-wire CKF plug found on 99-00 Civic Si and 96-01 integra’s.
Mario,
You could definitely try it!
packard,
No, shouldn’t have to perform this trick at all.
Your 97 EX wire harness should plug n’ play about 95% to the 99 D16Y8 engine (excluding the distributor; u should reuse your 97 EX distributor (or any 96-98 EX dizzy) if you still have it – don’t use the 99 dizzy, uses a different smaller dizzy plug).
my EX is a canadian model stock with D16Y7 originally. so still i do need to perform this mod? is the Y7 OBD2a or OBD2b? what about the Y8?
cheers
Packard,
Canadian aye? (no pun intended)
The CAN EX model should be the same OBD2 type as US models, so in your case 96-98 civics are OBD2a (its the year of the car that dictates OBD2a or b type). The Y8 is from a 99 so its OBD2b spec (99-00 civics = OBD2b). Interesting a CAN EX is a non-VTEC model (Si model has the Y8 correct?). You still do not need to perform this mod as all OBD2a/b US and CAN engines sport a CKF sensor.
Katman! thanks for this great find and for assisting everyone with it!
I myself had to do this trick after my CKF sensor got messed up. It worked like a charm and my engine started up and ran just like it did before the sensor went out. I have not gotten any CEL codes at all.
I do have a problem though!
It was time to do a SMOG check here (Cali) and so I took my car to get SMOG’d. They Failed me because they said
my cars timing at idle was jumping up and down from around from 9 or so to 14-15 degrees!
I was being honest with the guy and told him the CKF was broken so I did a bypass on it and he said that is most likely what is causing this problem with the timing at idle.
Does this bypass trick affect the timing at all? has anyone else checked the timing after doing this bypass?
After I did the bypass I never got any CEL codes at all and it runs just like it did before, so I am abit confused as to what could be going on. Any help in trying to fix this timing issue would be great cause I cant drive my car until its smogged!
Thanks again
Katman,
Yes, I’m using a obd2a p72 ecu.
I’m not sure what does the EX’s 3-wire EX CKF plug looks like nor the color of the wires. Can you please provide a pic or just tell me the wire colors, thanks.